WatchDK Production Testing Guide
This guide describes how to run the production test on the ZSWatch Development Kit (WatchDK) to verify that all hardware components are working correctly.
Required Equipment
- USB-C cable - for power
- SEGGER J-Link debugger or Nordic nRF Dev Kit (e.g., nRF54KL15DK) - for programming the device
- ZSWatch Development kit (WatchDK) - the device under test
- Vibration motor - must be connected to the WatchDK
- Display - must be connected to the WatchDK
Software Requirements
- Segger J-Link Software
nrfjprog(part of nRF Command Line Tools) and add to PATH
Hardware Setup
- Connect the J-Link debugger to the WatchDK debug header
- Connect the vibration motor and display to the designated connector
- Mount all jumpers if not already mounted according to image below
- Connect USB-C cable for power. No battery needed.
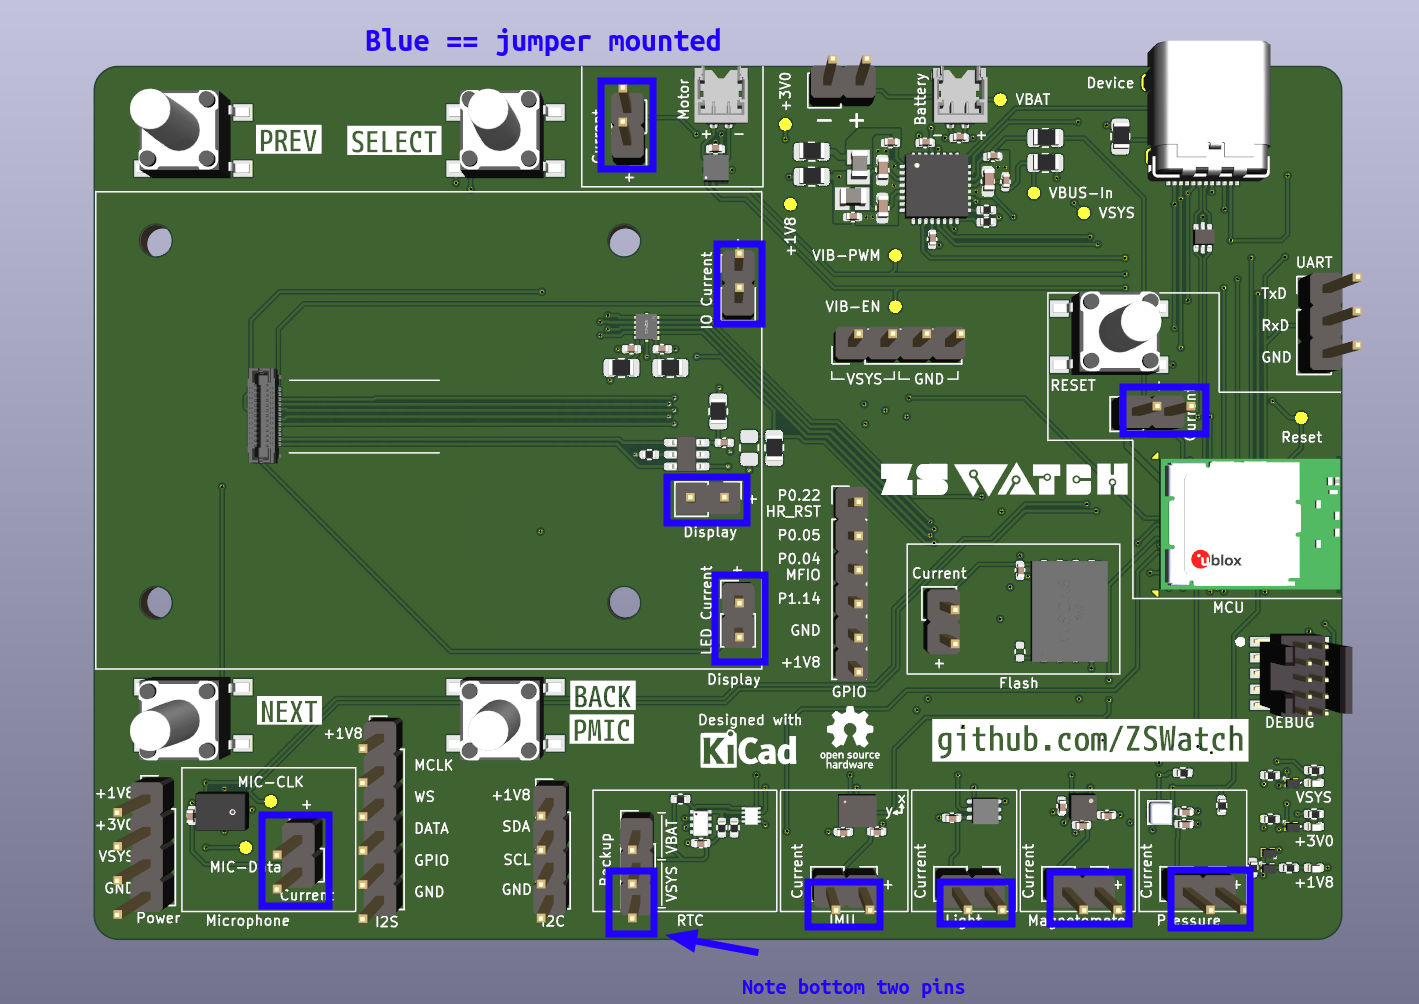
Jumper configuration for production testing. Ensure all jumpers are mounted as shown.
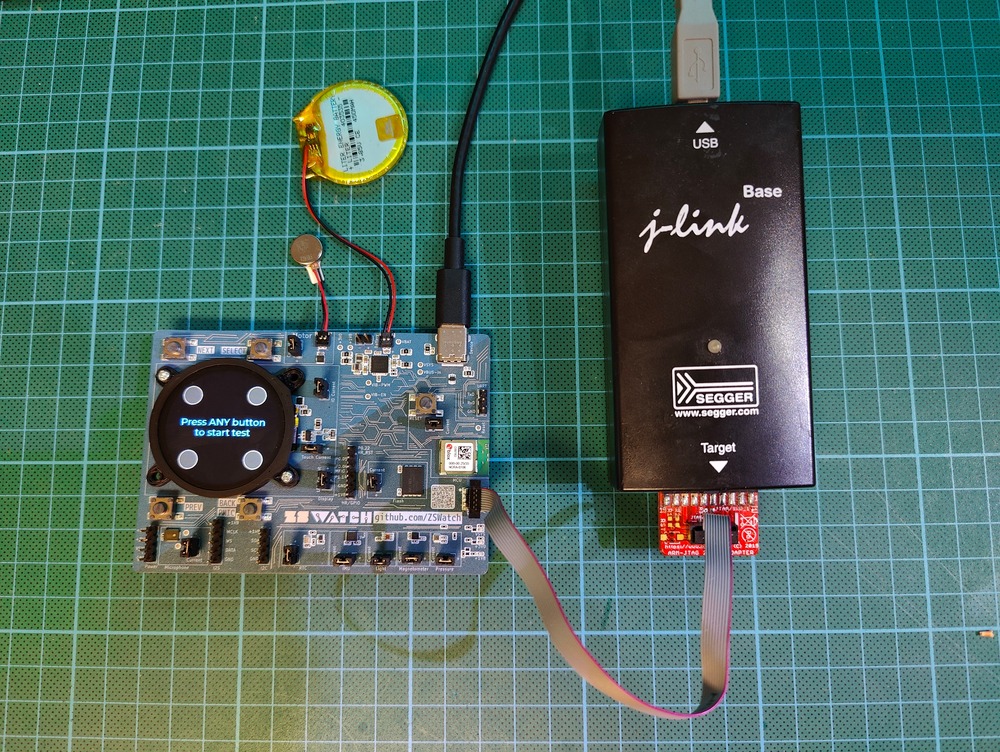
Full setup, ignore the battery, not needed.
Flashing the Test Firmware
Download the pre-built production test firmware or build it from source in production_test/.
Firmware can be downloaded from GitHub as part of CI build artifacts:
watchdk@1_nrf5340_cpuapp_debug/production_test_watchdk.hex
The production test firmware is a factory image that includes MCUboot bootloader merged with a signed production test application. This allows verification that the network core firmware is flashed correctly, as both cores boot together.
Flash using nrfjprog:
nrfjprog --recover --coprocessor CP_NETWORK -f nrf53
nrfjprog --recover -f nrf53
nrfjprog --program production_test_watchdk.hex --chiperase --verify --reset -f nrf53
The production_test_watchdk.hex includes:
- MCUboot bootloader for the application core
- Signed production_test firmware (linked at MCUboot slot address)
- The network core firmware must be flashed separately (see commands above)
Test Sequence
The production test runs automatically through the following tests in order. Each interactive test has a 15-second timeout. The UI will guide you, but here is a short summary of what it does.
Video Walkthrough
Watch a full run of the production test app to see the expected prompts and pacing before you start.
Direct link to video: https://vimeo.com/1141434425
1. Button Test
- Action: Press all 4 buttons (top-left, top-right, bottom-left, bottom-right)
- Pass criteria: All buttons registered
- Note: The countdown timer starts after the first button press
2. Vibration Test
- Action: The vibration motor pulses repeatedly. Press any button if you feel it vibrating
- Pass criteria: User confirms vibration by pressing a button
3. Backlight Test
- Action: Press any button to start. The display brightness will cycle between low and high
- Pass criteria: Press any button to confirm the brightness changed visibly
4. Touch Test
- Action: Touch the display
- Pass criteria: Touch input detected
5. Microphone Test
- Action: Make some noise (speak, clap, tap near the microphone)
- Pass criteria: Audio activity detected above threshold
6. Sensor Scan & Network Core Verification (Automatic)
The following checks run automatically:
- Sensor detection: All hardware sensors (IMU, magnetometer, pressure, environment, light) are scanned at boot
- Network core verification: Verifies the nRF5340 network core (BLE radio firmware) is flashed and running correctly
Results are shown if any test failed.
7. Final Result
- Shows PASS (green) or FAIL (red) summary
- Displays count of passed vs total tests
- Press any button to reboot and run tests again
Re-running Tests
Press any button on the final result screen to reboot and start a fresh test run.
Post Test - Flashing ZSWatch Firmware
After a successful production test, flash the full ZSWatch firmware:
Step 1: Flash the app core (with QSPI configuration):
nrfjprog --program watchdk@1_nrf5340_cpuapp_debug.hex --chiperase --qspisectorerase --verify --reset --qspiini app/boards/zswatch/watchdk/support/qspi_mx25u51245.ini --coprocessor CP_APPLICATION -f nrf53
Step 2: Flash the net core:
nrfjprog --program zswatch_nrf5340_CPUNET.hex --chiperase --verify --reset --coprocessor CP_NETWORK -f nrf53
Full Expected Output
Step 1 - Recover network core:
$ nrfjprog --recover --coprocessor CP_NETWORK -f nrf53
Recovering device. This operation might take 30s.
Erasing user code and UICR flash areas.
Writing image to disable ap protect.
Step 2 - Recover app core:
$ nrfjprog --recover -f nrf53
Recovering device. This operation might take 30s.
Erasing user code and UICR flash areas.
Writing image to disable ap protect.
Step 3 - Flash production test firmware:
Now you would runt he production test sequence.
$ nrfjprog --program production_test_watchdk.hex --chiperase --verify --reset -f nrf53
[ #################### ]   0.352s | Erase file - Done erasing
[ #################### ]   2.994s | Program file - Done programming
[ #################### ]   3.003s | Verify file - Done verifying
Applying system reset.
Run.
Step 1 - Flash net core image:
$ nrfjprog --program zswatch_nrf5340_CPUNET.hex --chiperase --verify --reset --coprocessor CP_NETWORK -f nrf53
[ #################### ]   0.293s | Erase file - Done erasing
[ #################### ]   1.338s | Program file - Done programming
[ #################### ]   1.345s | Verify file - Done verifying
Applying system reset.
Run.
Step 5 - Flash app core image:
$ nrfjprog --program watchdk@1_nrf5340_cpuapp_debug.hex --chiperase --qspisectorerase --verify --reset --qspiini qspi_mx25u51245.ini --coprocessor CP_APPLICATION -f nrf53
[ #################### ]   0.000s | Erasing non-volatile memory - Erase successful
[ #################### ]   1.611s | Erase file - Done erasing
[ #################### ]  11.610s | Program file - Done programming
[ #################### ]  11.506s | Verify file - Done verifying
Applying system reset.
Run.